As I've been looking through the pictures for this blog post I feel totally overwhelmed.
No wonder it took me so long to start this project!
So buckle up, this is a long one.
(There are before and after pictures at the end of the post. If you just want to see those, scroll down)
So buckle up, this is a long one.
(There are before and after pictures at the end of the post. If you just want to see those, scroll down)
Here's what the kitchen looked like before I started:
Several cabinets were seriously water damaged.
I started with replacing the window (which was broken).
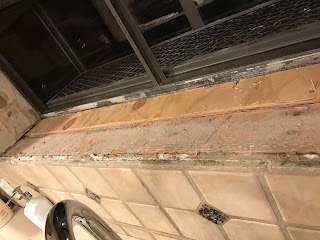
The window replacement required me to remove the tile in the window sill so that's when the dominoes started to fall.
New window getting installed!
We started removing the tile on the walls which led to removing the drywall.
Nothing is ever as easy as you think it will be!
Frank replaced the wallboard which turned out to be slightly more difficult than planned.
He had to fix the crazy wiring that we found behind the wall
(which, I guess, is a good thing in the long term)
Look how pretty that new drywall looks!
He put up the new beadboard backsplash
which was, again, a pain.
Here's the trim work along the top of the backsplash.
And that's when Frank's work ended and my work began.
I took down all of the doors, labeled and stored all of the hinges, and started all of the sanding.
This was my garage for a long long time.
We set up tables and I put all of the doors all around with tape on the tables so I would know which door was which when I was done.
I read lots of blogs and articles online to find the best way to paint kitchen cabinets and there are lots of opinions and short cuts out there.
I decided that I would not do any short cuts.
I would do all of the necessary sanding and priming in an attempt to have a finished product that would last.
I went to my local paint store where the people seem to know their stuff and asked which primer would be best...
I used the primer that they recommended.
After TWO coats of the primer (with sanding in between) it was clear that the wood grain was still leaking through.
Seriously annoying.
So it was back to the paint store to talk to a different person who recommended a different primer.
He was like "oh you're doing cabinets? then you definitely need to use this"
I was like "I told the last guy I was doing cabinets!"
The first primer was apparently good but this one is a last resort for hard cases.
My recommendation? Start with the last resort and save yourself many hours of extra work!
Zinsser BIN is a shellac based primer and seals in the wood tannin.
It does stink so you have to take precautions when using it.
I also sanded the cabinet boxes inside the house.
I used the rotary sander when possible but had to hand sand small areas and the top molding.
I managed to rig up a little connection for the sander to my vacuum which cut down on the dust considerably!
Even though I tried really hard to clean up each day, my kitchen was a disaster the whole time.
There were just tools everywhere and I had the drawers and items out of the cabinets in various rooms.
It was definitely a hassle.
Once everything was all primed, I started painting!
Using the right paint is key to get the best results.
In my case, I knew that the wood grain would still be somewhat visible.
If I had a professional do the painting, I could have had the grain filled in but it was more than I was willing to do.
I used Benjamin Moore Advanced paint
which is the same paint I used for my trim in the house.
It levels really well which is key for a nice finish.
I also painted the backsplash with the same primer and paint.
I used a satin sheen for the cabinets and backsplash and a semi-gloss for my house trim.
You have to wait 18 hours between coats for advance paint so there was always at least a day between coats...sometimes more because I had days where I just couldn't face the project.
Plus I had to sand between each coat.
I hate sanding!
I'm sure it's worth it in the end for smoother, tough finish.
(It's easier to say that now that I'm done)
After standing for hours in the garage painting the doors, I was in PAIN.
I have issues with pain anyway so standing on concrete and leaning over slightly for so long was really tough on my body.
Frank would be in the family room and I would be painting and moaning and groaning whenever I had to move to the next area...it's kind of funny now but at the time I couldn't believe how much my body hurt.
I was really happy with the finish after two coats!
More proof of the disaster that was my kitchen every single day:
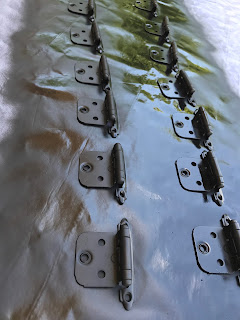
Once I was done painting the cabinets, I picked out hardware and then began painting the hinges to match.
I really didn't want to buy new hinges!
As a reminder, this painting of the cabinets is, for me, a temporary fix until I can afford to redo the kitchen for real with new flooring and a new island.
So I really wanted to keep it as inexpensive as possible.
The upside to using current hinges: the doors will hang exactly how they did before. No guesswork on where to place new hinges.
The downside to using the current hinges: the doors will hang exactly how they did before.
ha!
I had some doors that didn't close perfectly before but I decided that I was willing to have some funky doors in exchange for saving the cost of new hinges.
 |
| Here is one of my slightly wonky doors |
I was very careful to keep track of which hinges went to which doors!
I cleaned the hinges by putting them in the crockpot with a bit of dish soap and water for a few hours. It really worked great and the gunk came right off. The finish was dulled by this process as well so that little internet tip worked out well!
Labeling the table when it was time to paint, like I did with the doors, worked like a charm.
Once the hinges were all dry, it was time to put on the hardware and rehang the doors!
I found the knobs for the cabinets at a local hardware store and I found the pulls for the drawers at an online store.
I bought all of the knobs that the hardware store had in stock and then they ordered the rest for me, telling me they would be in in a few days. Yeah, it took a few weeks! ugh. It's kind of a long story which I might tell in another post.
I was pretty excited to get the doors back on so I marked the first door and drilled a hole for the first knob. So nerve wracking!
Aaaaaand...I screwed it up.
so after everything was FINALLY done, I had to fill, sand, prime and repaint part of that door.
*sob*
After that I was very careful to mark every door and drawer perfectly and then Frank drilled them with the drill press. That went better.
I spent a saturday putting on the hinges, rebuilding the drawers and putting them all back up on the wall. It was pretty exciting, not gonna lie. Even though I was missing a bunch of hardware, the kitchen felt done.
Here are some of the finishing touches that I did:
I had one of the hooks left that I put in the bathroom so I painted it a light chartreuse color and it will now hold my towels.
I installed a magnetic holder for my knives so that I don't have the big knife block on my counter anymore
as well as an under cabinet banana holder that folds up when no bananas are on it
And now for the grand moment....
the finished kitchen!
I didn't paint the island. It is still stained wood.
I will someday replace it with a smaller island and I'll decide then whether to do wood or a painted surface.
The whole room is so much brighter and inviting.
I love it!
Before and After pictures:


Great work and great storytelling. Congratulations!
ReplyDeleteYou are so amazing! It looks beautiful
ReplyDelete